How to redirect HTTP to HTTPS using .htaccess or web.config files? We have shared all the information to make your job easy.
Over the past few years, the number of cyber-attacks has skyrocketed, which makes SSL encryption no longer a choice but a sheer necessity. By installing an SSL Certificate on your website, you bypass the default HTTP protocol and activate the HTTPS protocol, which encrypts the server-client communication through public-private cryptographic keys.
However, installing an SSL certificate brings along certain technical challenges and the most common ones are redirecting HTTP to HTTPS on .htaccess file and HTTP to HTTPS web.config file. So, if you are struggling with these two common concerns, read until the end and you will know everything you need to. Let us begin with what is .htaccess, how to redirect HTTP to HTTPS .htaccess, and then move on to what is web.config and how to deal with that issue.
Table of Contents
What is .htaccess?
The .htaccess file is the abbreviated term for a hypertext access file, which contains a set of rules that are responsible for giving websites certain instructions pertaining to important settings. So, it is a server configuration file that allows you to set directory-specific server configurations, which makes it important for the smooth functioning of the SSL certificate.
Why redirect HTTP to HTTPS using .htaccess?
Your website could be running on both HTTP and HTTPS, which could lower the security of your website, and the only way to overcome that is by redirecting HTTP to HTTPS. You can do this by editing the .htaccess and web.config files, which are usually located in the root folder. At this point, you might be wondering what a web.config file is, so let us first get some clarity on that.
What is a web.config file?
The web.config file can be accessed from the FTP and is instrumental in managing several key website settings. A few to mention are database connection management, error handling, cache settings, and session-related settings. In most cases, websites have only one web.config file but there are also those with advanced requirements that are managed using multiple web.config files. The settings defined in this file are stored as individual XML files. Primarily, there are two types of web.config files — machine.config, which deals with server-related configurations, and web.config, which relates to application configurations.
How to edit a .htaccess file?
The .htaccess file is responsible for issuing instructions to the server on what it should do in certain circumstances. So, this file plays an important role in influencing your website’s key functions. Let us now see how you can edit this file to add pre-defined instructions. You can access the .htaccess file in many ways but the easiest and most convenient way to do that is by editing it in the cPanel’s File Manager, so let’s figure out how you can do that.
How to edit .htaccess in cPanel’s File Manager?
The easiest way to edit the .htaccess file is by logging in through the cPanel, which is the most convenient and widely used web hosting control panel. You should have the access given to you by your web hosting service provider. Once you have logged in, then follow the below-listed step by step instructions to perform the edits.
Step 1 – Access the Root Directory from cPanel
- Use your credentials to log into the cPanel
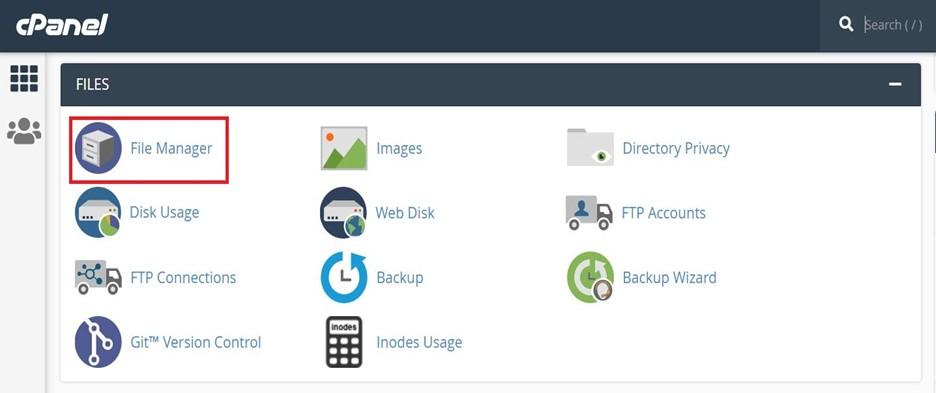
- Navigate to Files and click on the File Manager
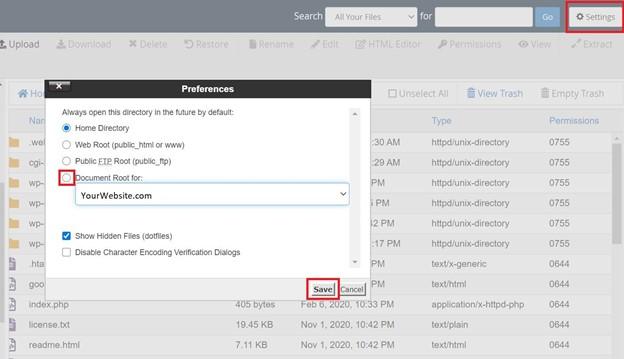
- Click on ‘Settings’ in the top-right hand corner
- Click on ‘Document Root For’ and select the relevant domain from the dropdown menu
- Check ‘show hidden files’ and click on save
Step 2 – Edit the .htaccess file
Once you have accessed the relevant root folder and made the hidden files visible, then the relevant directory’s content would be fetched. You can then edit the .htaccess file by following the below-mentioned steps.
- In the fetched files, right-click on the .htaccess file
- Click on ‘Code Edit’ or ‘Edit’, whichever option is available
- A pop-up would then appear asking you whether you wish to disable encoding, simply click on ‘Edit’.
- Make the necessary edits and click on save changes
- Check your website’s performance and in case of errors, revert to the earlier version using the backup. Else, you are done.
How to use the .htaccess file to redirect HTTP to HTTPS?
You can use the .htaccess file to redirect HTTP to HTTPS on a specific domain, specific folder, or to redirect all web traffic coming to a website. To do that, add the following code to your .htaccess website.
1. For redirecting HTTP to HTTPS on a specific domain:
RewriteEngine On
RewriteCond %{HTTP_HOST} ^yourwebsite\.com [NC]
RewriteCond %{SERVER_PORT} 80
RewriteRule ^(.*)$ https://www.yourwebsite.com/$1 [R,L]
2. For redirecting HTTP to HTTPS on a specific Folder:
RewriteEngine On
RewriteCond %{SERVER_PORT} 80
RewriteCond %{REQUEST_URI} folder
RewriteRule ^(.*)$ https://www.yourwebsite.com/folder/$1 [R,L]
3. For redirecting all traffic from HTTP to HTTPS
RewriteEngine On
RewriteCond %{SERVER_PORT} 80
RewriteRule ^(.*)$ https://www.yourwebsite.com/$1 [R,L]
How to Redirect HTTP to HTTPS using web.config?
You may or may not have a web.config file and depending on that, you may have to either create a web.config file or edit the existing one via FTP. To create a web.config file, you will require a text editor such as Notepad++ where you can copy-paste the below-mentioned code and then upload it to the FTP. Whether you create a new one or edit an existing one, the below-mentioned code should work.
<configuration>
<system.webServer>
<rewrite>
<rules>
<rule name=”Redirect to HTTPS” stopProcessing=”true”>
<match url=”(.*)” />
<conditions>
<add input=”{HTTPS}” pattern=”^OFF$” />
</conditions>
<action type=”Redirect” url=”https://{HTTP_HOST}/{R:1}” redirectType=”Permanent” />
</rule>
</rules>
</rewrite>
</system.webServer>
</configuration>
Where to Buy an SSL Certificate?
You can buy an SSL Certificate just like cheap Wildcard SSL, DV SSL, OV SSL from a Certificate Authority or your web hosting service provider or any SSL reseller. However, you must choose one based on how many domain extensions and subdomains you wish to encrypt with the SSL certificate. This is important because it helps to encrypt server-client communication and prevents packet sniffing, man-in-the-middle attacks, and other types of attacks that are launched to steal login credentials.
Conclusion
We have broken down the procedure to redirect HTTP to HTTPS using the .htaccess file and the web.config file in easy to understand steps. You can follow the abovementioned steps regardless of your technical skills. However, we strongly recommend backing up your entire website before you make any changes to your .htaccess or web.config files. So, if anything goes wrong, you can revert to the earlier version using the backup. Also, please note that throughout the article and screenshots we have mentioned ‘YourWebsite.com’ which you must replace with your domain name.


